Showing posts with label verdant. Show all posts

Tuesday, March 21, 2017

March projects for Lydia Guijt!

Hello Blue Fern Studios friends! 
Lydia Guijt here again with some new creations for March.
My first layout will be accompanied with a tutorial. You'll find that below.

For my second feature I've made something completely different. I hope you'll like it.

Memories


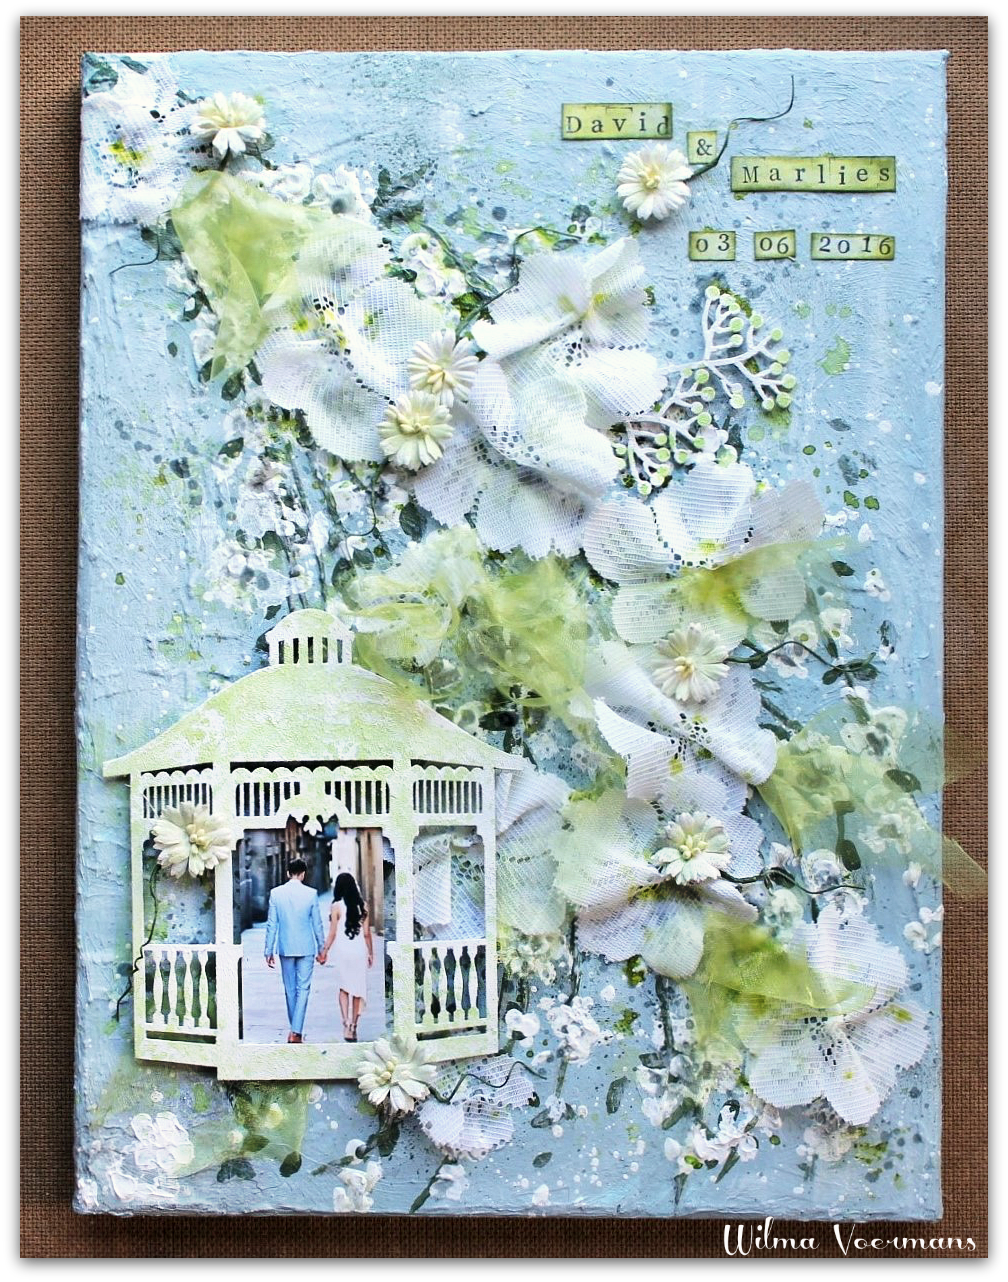
The new Spring Parade Collection has a beautiful color combination. For this layout I chose the Susie's Garden sheet.
 For my background I started off using the Tattered Harlequin stamp for embossing and the Tattered News Print stamp for inking. After this I used a stencil and paste. After the background work is done I prepared the chipboard pieces. 


Crossing the Lines with Speckled Mint and some Peacock FeathersWild Field Stem with Lavender Eggs on the flower part and Verdant with some sprinkling of Antique Gold. The same process for the Leafy Twigs. The title Memories - Chunky Words Halftone was done in Pink Dust. Once that was all done it was time to assemble the layout. I used the new Spring Peonies and Late Winter Lilies in my flower cluster. To finish off the page I added some further touches. 


Below you'll find the video with the whole process of making this layout. 
Enjoy!


Paper
Spring Parade - Susie's Garden
Chipboard
Crossing the Lines
Wild Filed Stem
Chunky Words Halftone
Leavy Twigs
BFS Embossing Powder 
Pink Dust
Speckled Mint
Lavender Eggs
Verdant
Antique Gold
Glitter
Peacock Feathers
Stamps
Tattered News Print
Tattered Harlequin
Flowers 
Spring Peony and Berries
Late Winter Lilies

Follow your Heart


For my second project I wanted to do something different. 
Our Blue Fern Studios Chipboard is so nice and sturdy, it's perfect to use for Mixed Media projects.
I got a double sided canvas and tore out the center to open it up. I used pastes and stencils to created textures on the outside and center part. Once it was all dry I started with the Shabby Bits Bricks Chipboard pieces as the bast to build the center part on. 


Using other materials like cardboard and metal embellishments stacking and tucking in and under to create interest and textures. On one of the top layers a couple of Leafy Page Accents. Around the edges I used the Note book Edges and having the Layering Stems fall over the edges.


With all the items in place and stuck down it was time to paint everything with black gesso. Once that was all dry it's time paint on all the the accents. The Follow your Heart title was first embossed and further highlighted with some acrylics and pastes.


Chipboard
Notebook Edges
Shabby Brick Bits
Layering Stems
Leafy Page Accents
Follow your Heart
Embossing Powder
Antique Gold

Spring Greetings


For the last project this month I decided to make a set of cards using the new Spring Parade collection.


I started of with cutting different sizes of paper and played around with them creating a layered look. Once it was right I started filling it in with some doilies and some lace. For the Easter card I used one of the Easter Egg Ornaments and embossed it with Lavender Egg. Giving it some extra glitter with Peacock Feathers. The Spring card has a Spring Trinkets chipboard piece and is treated the same way. 


To finish off the cards I used Later Winter Lilies and Soft Blossoms and some other decorations. The final touches were some mist splatters and we're all done with our card set.


Paper
Spring Parade -  Susie's Garden, Market Place, Spring Petites
Chipboard
Easter Egg Ornaments
Spring Trinkets
BFS Embossing Powder 
Lavender Eggs
Glitter
Peacock Feathers
Flowers 
Soft Blossoms
Late Winter Lilies


Thank you so much visiting the blog and looking at my projects! 

Hope to see you again next month!

Lydia Guijt

Tuesday, December 27, 2016

Mary Christmas by Elena Volchkova

Hi, everyone! Soon the New Year, and today I would like to please you with a holiday mood! My layouts and greeting cards for your inspiration!

"Two sweet girls" layout

This layout about two pretty girls - аunt and niece. But both know how to have fun. And they are having fun and celebrate! Young and wonderful!

I used the Deck the Halls paper from the Vintage Christmas Collection as my background paper.
Very festive scrap paper!


Good Vibes I covered with Imagine Ink Honey embossing powder


Arching Leaves was covered with mixture of Imagine Ink embossing powders in Verdant and Lucky, which give the the perfect combination! Magic Green!


I embossed small rings (from Mini Rings set) with the Magenta and Tangerine embossing powders. And I use them as Christmas balls with beads, bells and sequins.


Blue Fern Studios Supply List:
Paper: Vintage Christmas - Deck the Halls; Vintage Christmas 2 - Holiday Cards
Chipboard: Arching Leaves, Good Vibes, Mini Rings
Imagine Ink Embossing Powder: Honey, Verdant, Lucky, Magenta, Tangerine
Flowers: Tranquil Blooms


"Christmas in Paris" layout

My second layout this is a fantasy of Paris. On a beautiful winter fairy tale in the in the dreamy city.
I used the Noel paper from the Vintage Christmas Collection as my background paper. And a lot of romantic details, 
I invite you to enjoy. I invite you... to Paris :)


Photo of the Eiffel Tower with trees in the snow, old letters, metal corner openwork, flowers and thread sisal.


Corner Flourishes I divided into two parts. They was covered with Coral Imagine Ink embossing powder.


French Word Plaisir I embossed with the Celestial Imagine Ink embossing powder.


The star anise adds warmth. And red glitter accents added to the festive mood. I used Fire Engine glitter in my layout.


Blue Fern Studios Supply List:
Paper: Vintage Christmas - Noel
Chipboard: French Words, Corner Flourishes
Imagine Ink Embossing Powder: Coral, Celestial
Glitters: Fire Engine
Flowers: Christmas Blooms, Soft Blossoms

Two christmas cards


Creating postcards in December is do wonderful process, so is it possible create only one item? Minimum two and they are is never enough somehow :) So my advice - always make them a little more!


I used the Tree Trimmings paper from the Vintage Christmas Collection as cards background. And I cutting elements from Holiday Cards (also Vintage Christmas Collection)


I embossed the Seeing Stars with the 14 Karat and Copper embossing powders.
Joy & Love I covered with Imagine Ink Poinsettia embossing powder


Blue Fern Studios Supply List:
Paper: Vintage Christmas 2 - Holiday Cards, Tree Trimmings
Chipboard: Good Vibes, Seeing Stars
Imagine Ink Embossing Powder: 14 Karat, Copper, Poinsettia
Glitters: Sunshine
Flowers: Christmas Blooms, Memoires Blooms,


I hope you enjoy viewing my works.
I congratulate all of you with the New Year 2017! Let it be magical and wonderful!

Hugs, Elena Volchkova

Tuesday, June 14, 2016

Three times mixed media with Attic Charm by Wilma Voermans.

For this layout I used the monthly sketch which you will find here.
Orange is a favorite color for me, to use in vintage aswell as modern layouts.
This picture shows my daughter ready for travelling on the station.
The whole scene gave me a vintage feeling. I love that picture.
My starting point was the KEY paper (B-side).
I use mostly B-sides of papers, no intention, I just like them better ..

The sketch ( I turned it)


For the orange color I  used beads


I colored the white daisies with the orange heart with paint and gesso.
Afterwards I felled sorry for this, because 1 week later my son married.
And what had the bride in her bouquet??? White daisies with a orange heart !
And my beautiful white ones are used....


The lamppost is grunged up with embossing , gesso and paint.
To mimic the brigthness where the lightsource comes from I used golden paint ,
over golden embossing
*******

Second layout is also based on the June sketch.....
It was supposed to be  masculine, since I used a photo from one of my sons.
But there is a difference for me  between very masculine pictures for example in black and white.
This picture is in soft colors , so I did not overdo the masculine theme.


I started with the Sachet paper ( B-side)  out of the Attic charm collection.
My favorit without a doubt..
Colored the background with pastels and water., but left the beautiful pattern to show through.
In the background there are a few soft flowers that I covered up with gesso and my photocluster.
With a black perlpen, I draw random figures.
Than with a mask some greyish/blue inking.


The chipboard is a frame piece ,  one of the clipboard set.
I cut it up, used one as my love you title and the rest here and there over the layout.
I made a mix from nutmeg and oatmeal powder.
The color gets less intensive because of the oatmeal. 
Tip for summerlayouts: Oatmeal is super for beachthemes!

The titel is just inked up with black drawing ink

*******


My last layout for today is also in green/orange  Like the first one.
It just came out this way :) 
Although the orange is not that obvious like the first layout.


The start of the layout was on the beautiful Generation paper (Yes, again the B-side).
Starting off with two colors orange ink.  (offcourse first clear gesso )
Random heavy gesso, and than different shades of green embossing sprinkled over the background.
I have many many colors Blue Fern Studios embossing powder.
It is  such a luxury to pick the colors out of the whole range.
Here I used verdant and Lime..
Heatset it.
Than with a foliage stencil again heavy gesso.


The chipboard pieces I used are all embossed with pearl embossing powder.
Flourish, winter page dangle and title.


Thanks for visiting the blog, 
I hope you liked my post.
x Wilma x


Monday, April 18, 2016

Grungy Art Journaling- By Keren Tamir


Hi Everyone,
Its Keren here with two new projects for the Blue Fern Studios blog.
As I usually create layouts, I really wanted to to create something different that comes from my heart.
I felt art journaling was the best way to express how I feel and to experiment with the chipboards, embossing powders and glitters.

I also really wanted to create grungy mixed media pages so I added lots of texture and movement.


"Imagination"


First I inked the background in green and yellow tones. Then I stamped the background using the Journey and Textured circles stamps.


The circle was created using thick texture paste. Then I sprinkled embossing powder on it and heat dried it. Finally I glued the beaded string chipboard piece that was embossed in verdant and seven seas embossing powder.
The Serendipity imagination title was embossed in the 14 Karat embossing powder.


I also used the lattice bits on my page which were embossed in seven seas, verdant and 14 karat embossing powders, too. The heart was embossed only in the 14 Karat embossing powder.
I also sprinkled some Fool's gold glitter on the background.


<<<<<<<<>>>>>>>>>

"Inspiration"

This is my second grungy texture mixed media journaling page.
This time I used a different set of colours and textures.


The tattered diamond bits chipboard was embossed in raspberry embossing powder. The Serendipity Inspiration word was embossed in the poinsettia embossing powder.


Thank you so much for visiting the Blue Fern Studios Blog

Have a wonderful day!!

Keren

Thursday, April 14, 2016

Mixed media Wedding canvas and a layout with video by Wilma.

One of my sons will marry his girlfriend in June.
Not a big wedding with white dress and all....
We just have a nice day high up on the alp where they are living in summer with the animals.
Swiss music , food and the cows .... :)


To remember the day I made them a 11x14 mixed media canvas.
It takes another 6 weeks until they get married , so I had to use a Pinterest picture for now :) 
Offcourse I will add their own picture to the canvas.

I started by adding gesso, very rough so I had some texture .
Than I painted Spring blossom , not too exact, it is just a background.
Than I cut out flowers from a old curtain I bought for 50 cents at the driftstore .
You know the thin curtains most old paople have.....
They are great for texture or cutouts like the white flowers here.

Some green tule (driftstore too ) and a few little flowers.
I had this chipboard piece for some time and this was a great opportunity to use it.


The Gazebo piece is stippled with gesso.
After it dryed I mixed gesso and lime paint to get a soft color.
I sprenkled it over the whole canvas including the chipboard and than washed it out random.
This way I keep some white which makes it more interessting for me.

I also used the berry stems , did the same, but keep the paint a little darker .
I added it with a little paintbrush, random again.
********


For my second project I made a mixed media layout.
In the video you will see how I sometimes change my mind during the process...


The chipboard pieces are both embossed .
I used the Chelsea Vines and Butterfly friends
Embossingpowder colors : Verdant and garnet


The titel is stippled with gesso...


Papers I used are from the Ombre dream and Frolic collection.

If you like you can watch my video here, hope you will like it...


Thanks for watching my April post
x Wilma x