Showing posts with label French Ironworks. Show all posts

Wednesday, October 12, 2016

Blending the Old with the New; October Inspiration with Sandi

Hello, hello!
Sandi here with you today sharing my October creations.
I've used 3 different paper collections but one thing remains the same: awesome Blue Fern Studios chipboard!

I received the new Memoires paper collection just a few days ago along with a new batch of chipboard, flowers, stamps, embossing powder and glitter. I love taking time to admire everything and start formulating ideas for projects.

"True Story"

The Memoires paper are my new favorite … they are kind of a blend of the "Serendipity" feel paired with the warm colors of our "Autumn Anthology" papers. So hard to decide where to start because each one is so beautiful! 

The base layer is Twilight Fable layered with some torn Nature's Novel and Calling Cards for my photo layers. I did some mixed media work and then stamped randomly with the Crackle Textures stamp. Behind my photo you'll find the Persian Ornament chipboard piece which was embossed with the new Mocha Embossing Powder. It sure does shine! I treated the title piece from True Story, Big Drama the same way. I wanted the colors to mimic the papers, so stayed in that color family.  


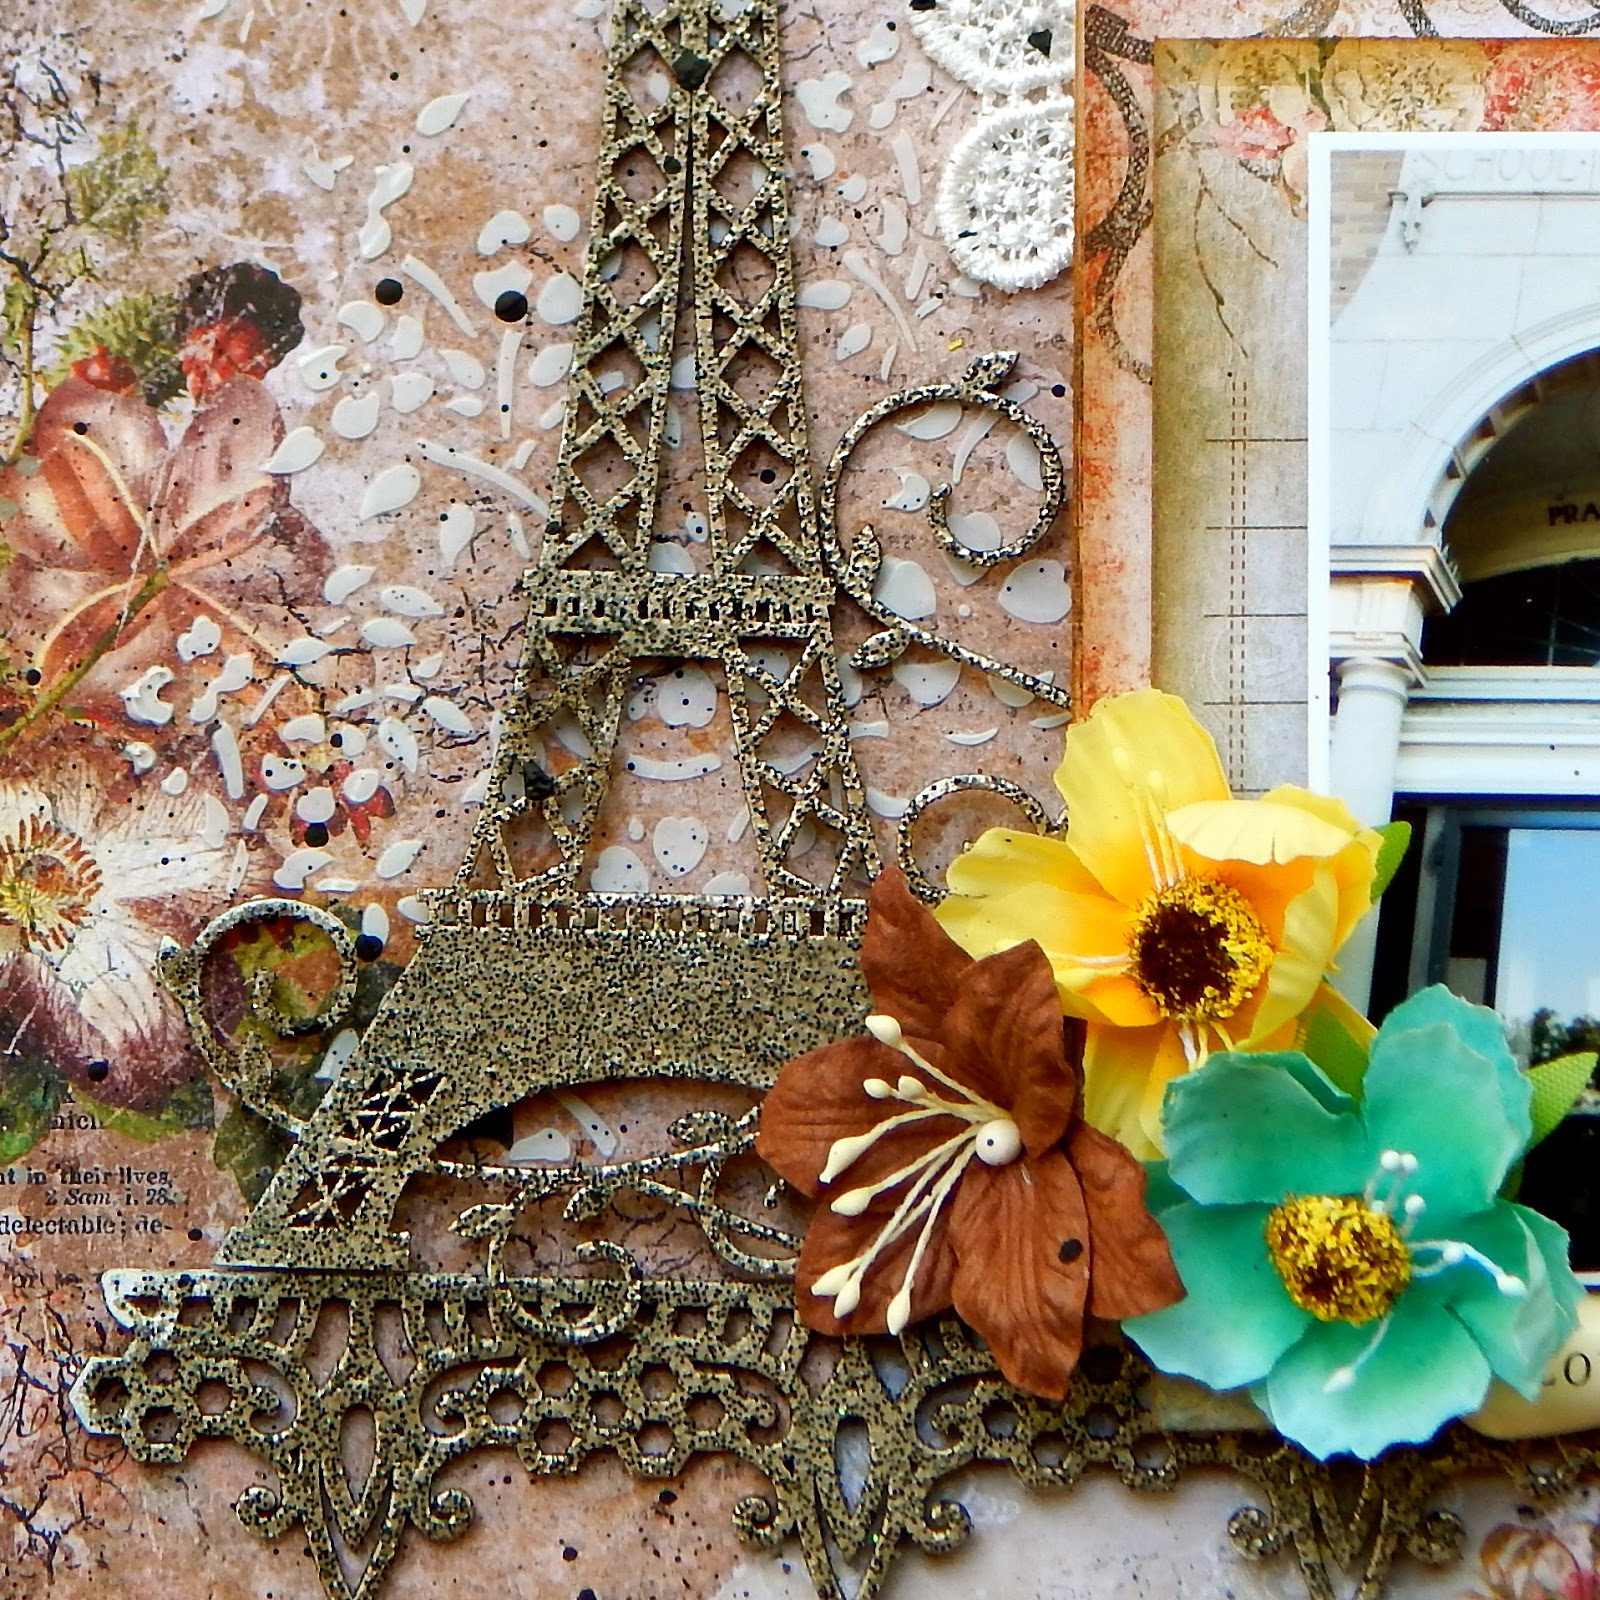
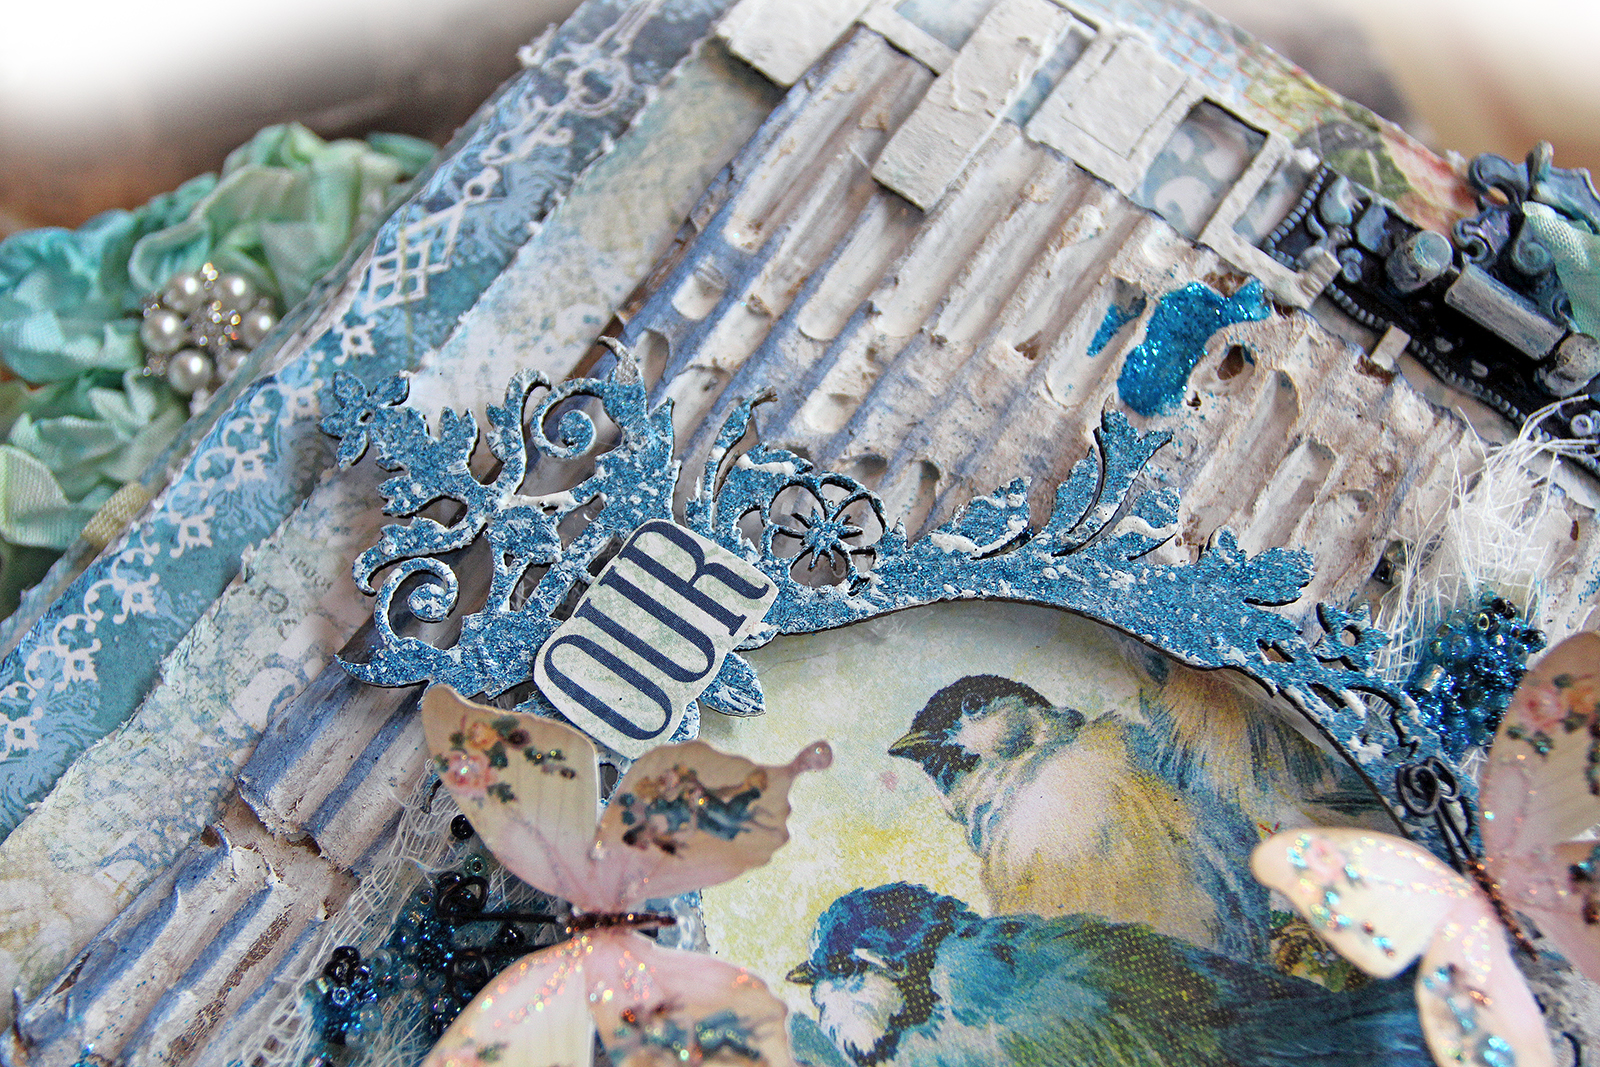
The Spring in Paris chipboard piece is divine! I chose Black Sand embossing powder for that one as well as for the border piece, Mina's Border. I thought is would work well for architectural pieces. Here you can see some of our new flowers, Memoires Blooms. So yummy! 


My border is only attached in one spot since it is layered over the Persian Ornament piece, so it looks a little crooked although it's not. It's just dangling a bit. See how much shine you get with Mocha Embossing Powder, wow!


I'm dying over all the new stamps I received this time! Some of them have been available for a few months but my previous DT order went in before their release. I love stamps that have textural effects and have used this one around the edges of the paper and then randomly thoughout the design. 


A really good look at the Persian Ornament chipboard! 


Another sweet Memories Bloom off to the side. 
I finished with some black ink splatters. 
Now I can't wait to create my next Memoires project! 

Blue Fern Studios products used:
Paper: Memoires Twilight Fable, Nature's Novel, Calling Cards
Chipboard: Persian Ornament, Spring in Paris, Mina's Border, True Story, Big Drama set
Stamps: Crackle Textures
Embossing Powder: Mocha, Black Sand
Flowers: Memoires Blooms
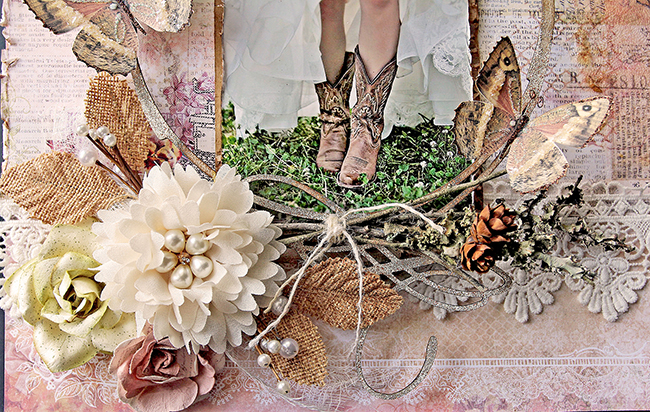
***

"Reminisce"

Serendipity is the collection that just keeps on giving for me! I have used almost all I have and am saving my tiniest scraps because it is so cherished! This time another engagement photo with a sunburst which captures the joy between these two lovebirds! 

I did some texture work on the Merriment paper and then starting preparing my chipboard pieces. First the Rose Collage and then the Destiny Collage. This time, I decided to colorize with gelatoes after priming my chipboard with white gesso. Then I kicked the pieces up a notch by adding some random Auburn Embossing Powder. The Reminisce title piece from Serendipity Words 2 is simply inked and then dabbed with white gesso. 


For flowers, I've used a combination of Tranquil Roses, Memoires Blooms and Late Winter Lilies. Layers were built with torn pieces of the Fascination paper and corrugated cardboard. 


 The Calling Cards that come with each paper collection are perfect for layering and as seen here, for using as a subtitle or title phrase. I've tucked in a bridal pearl spray from my stash and added a few art stones to my design. Of course, everything was dabbed with gesso to blend. 


The Destiny Collage piece is a knockout on its own but the Auburn Embossing Powder is perfect for providing warmth to the page. 


Just a close up of both the right corner of my design.  


And finally a good close-up of the chipboard pieces themselves. 

Blue Fern Products used:
Paper: Serendipity Merriment, Fascination and Calling Cards
Chipboard: Rose Collage, Destiny Collage, Serendipity Words 2
Embossing Powder: Auburn
Flowers: Tranquil Roses, Memoires Blooms and Late Winter Lilies

***


My last project was based on this month's Sketch by Michele Singh. You can find the October Challenge HERE.  We hope you'll find time to play along! 


"Yesterday"

I've been waiting to scrap this sweet photo since last November. As a Designer I am always working ahead, so I was using Christmas paper by the time I got the photo. This is sweet granddaughter Zoe with a pumpkin almost half as big as her! 

I dug back for an old favorite of mine, the Ombre Collection, specifically Leslie's Dream and Shannon's Dream. I took this opportunity to use the French Ironwork chipboard to anchor my design. I doubled my photos and nested then on some Calling Card, Shannon's Dream, cheesecloth and flowers! 


The Seasonal Wildflowers are a favorite of my as well, especially for outdoor scenes. Tp add color I've used a combination of Lime and Sage Embossing Powder. 


The French Ironwork is a majestic piece that I could used over and over. There are so many ways you could alter this for your designs. Here I've inked the piece and then added Nutmeg, 14 Karat and Chili Powder. The Yesterday title was treated the same. 


My Attic Charm flowers seemed a perfect match for my little pumpkin patch, so I used the Glitter Roses and Attic Charm Daisies to complete my design. I added a few simple textural pieces such as cheese cloth and seam binding. To draw the eye to the center of the page, I use Persimmon Imagine Ink Mist around the central design to blend everything together and then to splatter on the page. 


Just a dab of gesso and I'm done with this one! 

Blue Fern Studios products used:
Paper: Ombre Dreams Leslies Dreams, Shannon's Dreams and Calaling Cards
Chipboard: French Ironwork, Seasonal Wildflowers, Today, Tomorrow, Yesterday
Embossing Powder: Nutmeg, 14 Karat and Chili Powder
Stamps: Halftone
Flowers: Attic Charm Glitter Roses, Daisies
Mist: Persimmon


I think that wraps up October for me. 
You'll be seeing me here next month with some more Memoires creations! 
Thanks for coming by! 
Sandi

Thursday, June 23, 2016

Attic Charm inspiration by Pascale

Hello Sweeties,

Today I'm up on Blue Fern Studios blog with 3 new projects featuring the new paper collection: Attic Charm. The first project  is a canvas I made for a friend whose son get married last month.


I started to glued a tissue paper to the canvas and covered it with a thin layer of gesso. Then I layered together some paper strips (Haberdashery, Sachet, Generation), lace, drywall tape, ...  and covered them with a thin layer of gesso too. 


I added a design with the Serendipity Medley stamp that I embossed with Honey Imagine Ink. I colored the background with different colors of watercolor, Bister and Primary Element. 


I primed the chipboard with white gesso. I colored the French Word "Bonheur" with a Primary Element. as well as the Jeweled Frame


I stamped and embossed also the "Jeweled Frame" with the Serendity Medley stamp and the Honey embossing powder.


I die-cut some leaves in the Generation paper. I sprinkled them lightly with the Verdant embossing powder that I heat set.


Blue Fern Studios products:

Attic Charm papers - Haberdashery, Sachet, Generation
Flowers  - Attic Charm Daisies
Chipboards  - French Words, Jeweled Frame
Stamp - Serendipity Medley
Imagine Ink - Embossing Powder - Verdant, Honey

-----------------------------------------------

My second project showcase a photo of the Castle of Brézé (Brézé, Loire Valley, France). You can't see it on the photo, but there is an underground castle under this one that is quite impressive. 


I cut the Sachet paper in the middle and glued the edges together so they were in the middle. Then I added a layer of clear gesso. When dry, I added a design with a stencil and a white crackle paste.


I primed the French Ironwork with white gesso and the Spring Branch with a clear gesso. 


Then I colored the chipboards with some Twinkling H2O. While the watercolor were still wet, I sprinkled the Spring Branch with Sage, Lime and Nutmeg embossing powders. I added also some Icicle emboosing powder to the French Ironwork.


When the crackle paste was dry, I colored the backgroung, before gluing all the embellishments.


Blue Fern Studios products:

Attic Charm collection: Sachet, Haberdashery
Flowers - Attic Charm Glitter Roses
Chipboards - French Ironwork, Spring Branch
Imagine Ink - Embossing Powders - Sage, Lime, Nutmeg, Icicle

----------------------------------

The third project showcase a photo that was also taken at the Castle of Brézé. I was trying to find the right angle to take my photo, when I was startled by these bee: I haven't notice that she was in the flower, but I was lucky enough to have time to take these photo; it was only when I print the photo that I discover there was more than one inhabitant in this rose...


As usual I started to primed the background (Generation) with a clear gesso. While it was drying, I mixed some Mica Powder with a soft gel and texture powder: I used this paste to add a design with a stencil.  


When dry, I added some white crackle paste. I let dry again before adding some color. 


I stamped randomly the background with one of the Circle Textures stamp (music notes) and a metallic paint.


I colored the Floral Lattice Bits and the Tranquil Foliage with a metallic paint and a pink watercolor to the latter. Then I dried brush the flowers with a white gesso to add some light.


Blue Fern Studios products:

Attic Charm collection - Generation, Mercantile, Calling Cards
Chipboards - Tranquil Foliage, Floral Lattice Bits
Stamp - Texture Circles

Monday, April 11, 2016

From Romance To Grunge by Nicole Doiron


It's me Nicole and I am thrilled to be back with you to share some of my creations.
I have 3 layouts to show you today, going from romance to more romance to grunge!

Let's start with this one... soft and elegant.... using the Courtship Lane collection.


I stamped some of the tiny dot stamp from the Halftones set and
used Imagine Ink Snow embossing powder to add texture to my background.

It's no surprise that one of my favorite themes to scrap is love. And so this title Amour from the French Words set, was perfect for this picture of me and my man!


The majestic chipboard piece below is French Ironwork.  I covered it, as I did to the title, with Mystic Plum embossing powder, then frosted it with a little white.


The smaller flowers used are from the brand new BFS Courtship Roses and Blooms set.  They're beautiful!


Bordering the photo is one of the Leafy Page Accents. and some fussy cut flowers.


Blue Fern Studios Supply List:
Paper: Courtship Lane (Lover's Lane, Bourbon Avenue, East Plaza, Calling Cards)
Chipboard: French Ironwork, French Words, Leafy Page Accents 
Stamp: Halftones
Imagine Ink Embossing Powder: Mystic Plum, Snow
Flowers: Courtship Roses, Courtship Blooms

***

My second layout is quite similar in style to the first one .


I chose a combination of papers from the Sanctuary, Love Story and Frolic collections.
That is just one of the many things I love about Blue Fern Studios papers... no matter the collection, they are all so versatile and work together very well!

Creating part of my title is the word 'Happy' from the Optimist Word Set... I simply painted it red.
Then, dangling from the bottom of my picture is the Mini Frame Dangle which I cut in two pieces and covered with Imagine Ink Oatmeal embossing powder and white paint.  In the frame, I put a piece of red Frolic paper and added some Fire Engine glitter to give it a little sparkle.


The other piece of the Mini Frame Dangle I used on the left side of my page as a flourish sneaking up from the mini prints.  You can see glimpses of Garden Frolic stamp on my background.


Included in my flower clusters are the beige Courtship Blooms.  I sprinkled some more Fire Engine glitter in and about the flowers.


And last but not least, you can see some Frolic Mesh treated with Ebony embossing powder.
The picture is of Yves and I on one of our very first dates, which was already 10 years ago!


Blue Fern Studios supply list:
Paper: Sanctuary (Birdsong Melody, Calling Cards)
Love Story (True Harmony)
Frolic (Calling Cards)
Chipboard: Optimist Word Set, Frolic Mesh, Mini Frame Dangle
Stamp: Garden Frolic
Imagine Ink Embossing Powder: Oatmeal, Ebony / Glitter: Fire Engine
Flowers: Courtship Blooms

***

Now let's get down to the grunge part of this reveal!


This last layout today was inspired by the Blue Fern Studios April Sketch!


Ever since I started designing for Blue Fern Studios, I have been holding on to these particular chipboard pieces and was so anticipating creating the perfect boy layout.  I'm not sure if this layout is anywhere near perfect, but I have to say that I really love the way it turned out.

I started off a background paper from the Love Story collection and then covered it with blue and black mists as well as dabs of metallic blue paint and splatters of white.  I also did some black stamping using the Journey and Texture Set One. You can see here the title Boy Meets World which I embossed in Cerulean Imagine Ink embossing powder and lightly dabbed with more blue metallic paint.


For sure two of my favorite BFS chipboard pieces are the Techno-scape and Working Parts!  I love anything grunge and steampunk even though not my usual style.  On these pieces, I used Icicle embossing powder and then added some light dabs of blue.


Other chipboard used are two circle arrows from the Directions set, embossing with Ebony.


This gorgeous little boy is Tristan, my friend's son.


Blue Fern Studios Supply List:
Paper: Love Story (The Grand Ball)
Chipboard: Boy Meets World, Directions, Techno-scape, Working Parts
Imagine Ink Embossing Powder: Cerulean, Ebony, Icicle
Stamp: Journey, Texture Set One

Hope you enjoy! 
I would love to read your feedback in the comments!

Monday, January 4, 2016

Welcoming In The New Year With Blue Fern Studios~


Welcome to to the New Year and welcome to my very first Blue Fern Studios Post!!!
To kick things off, I would like to tell you a little bit about myself. 

My name is Renea Harrison aka Reneabouquets in the virtual world, a Southern Girl, born and raised in Tennessee. I have been married to my husband, David for over 25 years, and we have one son, Draven, who went off to college last year. I am the bookkeeper for our local business and owner of the Reneabouquets.com Store and Reneabouquets Etsy.
 I don't just love scrapbooking, I am passionate about it. I love every aspect of this amazing multi-media art. I love the art of the creation itself, from taking the design in my head and getting it out onto paper, to the social aspect of it. I love sharing what I know, and learning what others share. 
As a scrapbook artist, I don't really have any one set style. I tend to scrap whatever mood I happen to be in which can range, from Shabby Chic, Girly Girl, Vintage and Girlie Grunge to Masculine, Grunge, and Mixed Media. 
As an artist, I think that one of my greatest hopes is that I can inspire you to create and can teach you something new that you can take and use in your own work, so let's get started!!

Boots, Beauty & Blue Fern:
I love sliding into a comfortable pair of boots, and for this Design Team layout, I couldn't help, but get inspired by the Swirly Circle Chipboard Frame to create something rustic meets beautiful!!


I started with a layer of Blue Fern Studios Autumn Anthology-Newsworthy Paper, I then took another piece of the same paper and used the backside, tearing and inking the edges to fit my design. Next, I added a layer of corrugated board that I heavily inked and added my photo to.


I took the Blue Fern Swirly Circle Chipboard Frame, inked it up and then randomly heat embossed it with some Imagine Ink Oatmeal Embossing Powder to get a wonderful, rustic look, and layered it over my photo.


I added some lace to add a feminine touch, and then took some branches with moss, made a little stack and wrapped and tied it with twine, added some mini pine cones and popped some of my handcrafted butterflies.


I added some cheesecloth, burlap leaf picks, a large chiffon flower and some more flowers to round out my feminine meets rustic look. 


I then crackle painted some areas around the frame, and inked them, then took a Blue Fern Essential Textures Stamp and did some stamping. Stamping can add a lot of texture and dimension on your layouts and the Essential Textures Stamps are so perfect for adding background noise. 


Here is some more detail of the Yumminess of the stamping. 


In the top corner of my layout, I inked a "Natural Beauty" chipboard piece from the Blue Fern, All Natural Set. I inked in a way that let some of the natural kraft color of the chipboard show through to get a variegated color effect. I then added some more twigs wrapped with twine and pine cones. I took some of the paper pieces left over from the tearing I did and rolled and inked them, then tied more twine around them. I fussy cut out a little bird from the paper and glitter painted him up and then popped him on with foam tape for dimension.


And here you can see all the dimension and texture that you can create using  Blue Fern Products.

Blue Fern Studio Supply List:
Paper:
Autumn Anthology~Newsworthy
Chipboard:
All Natural Set (Natural Beauty)
Swirly Circle
Stamp:
Essential Textures
Imagine Ink Embossing Powder:
Oatmeal

Getting Winterlicious With The Blue Fern Sketch:

Each month Blue Fern Studios has a sketch challenge that you can take part in. Here is this month's January Sketch:


And here is my Design Team take on the sketch:


I decided to work with some papers from the Blue Fern Deja Vu line to get a Winterlicious, frosty look!! I started with a piece of Lustre Paper and then used another piece of the same paper, this time using the backside. I distressed the edges heavily and did some grunge punching. I used a stencil and texture paste to create the snowflakes on the background paper, and  I then added in 2 more layers of Tresors paper, adding sand paste and Glitter Glass to create a Snowy~frosty look.


Next, I took a Blue Fern Chipboard French Ironwork, painted it with crackle paint and then clear emboss inked randomly and heat embossed using the Imagine Ink Mystic Plum Embossing Powder, and added a crystal for a little bling.


The snowflakes were created by taking Blue Fern Chipboard Winter Flakes,  painting them with white gesso, and then heat embossing them with Imagine Ink Icicle Embossing Powder.


To add a little more texture and bling, I then added Silver Microbeads to the tips of the flakes and overlaid them with Snowflake Buttons. 


I created a flower layer at the bottom corner of my photo.


I also popped on some of my handcrafted butterflies for some extra sparkle!!


I love that Blue Fern papers are so high quality and thick that they can handle all of my mediums, textures and layering! Just look at all the dimension that they allow you to achieve.

Blue Fern Studio Supply List:
Paper:
Deja Vu-Lustre
Deja Vu-Tresors

Chipboard:
French Ironwork
Winter Flakes

Imagine Ink Embossing Powder:
Mystic Plum
Icicle

I love creating off the page projects, and one of my FAV things is mini albums. I love creating pages that have little tuck ins for storing memories, and all kinds of unexpected treasures!!


 For this mini album, I used the Blue Fern Frolic Paper Collection,  starting with a layer of Friendship as the base layer and then adding a layer of  Petits Moments


I then added a layer of corrugated board that I added some beads, Imagine Ink Embossing Powder In Cerulean and cheesecloth to grunge it up a bit. I took some pieces of  the Blue Fern Shabby Brick Pieces Chipboard, textured them and added them to my cover design.


Next, I fussy cut out one of the birds from the Friendship Paper and glitter painted him up, then cut out the rest of the bird design and added it to a Blue Fern Majestic Chipboard Frame.


I painted the frame with a coat of gesso and then heat embossed it with the Cerulean Embossing Powder.


Here is a look at all the layering.


Here I created pocket pages with tags using the following Blue Fern Papers:
Frolic Petits Moments
Frolic Veranda


For these pages, I used:
Frolic Friendship and Frolic Petits Moments Papers
there is a pocket that I created using a cut out of the birds design and then created,


a sweet, little sewn booklet from the Calling Cards Paper, 


and a tag that tucks in at the top from the Dans Le Jardin paper.


These pocket pages were created with the Frolic Adorn Paper.


And all the tuck in and tags were created with the Frolic Calling Card Paper.


The last set of pages were created with the Frolic Dans Le Jardin Papers and feature a pocket,


With Frolic Calling Card tags as well as a large tag, tuck in created with Frolic Friendship Paper.


The back side was created using Frolic Friendship Paper.

Thank you so much for joining me for my first Blue Fern Studios Reveal! I hope that you have enjoyed getting to know a little bit about me and also that you have enjoyed my projects. Here is to a New Year full of Creativity, Inspiration and Fun!! Hugs ~Renea

Blue Fern Studio Supply List:
Paper:
Frolic Friendship
Frolic Calling Cards
Frolic Dans Le Jardin
Frolic Petits Moments

Frolic Veranda
Frolic Adorn

Chipboard:
Majestic Frame
Shabby Brick Pieces

Imagine Ink Embossing Powder:
Cerulean