
It is hard to believe that another year has almost come and gone! I can not believe it is now time for the end of the year Holidays and that my 2016 term with Blue Fern Studios will end with these last three, December projects. I have thoroughly enjoyed getting to create for the Team , and I just want to say thank you to everyone at Blue Fern Studios for such a wonderful year of crafting!! It has truly been a pleasure!
For this first layout, I decided to capture a YUMMY, frosty, Winter look:

I used the new Blue Fern Studios Vintage Christmas 2 Paper Collection for this project, and started with a layer of Jolly Paper, I then punched a layer of Let It Snow paper with a snowflake punch and distressed, texture painted and glittered the edges. I added a Victorian Angel Die Cut to the bottom corner.

Next, I added a layer of lace,

took a Snowflake Frame, painted it with white crackle texture paint, and then added silver seed beads to it.

I then took an Organic Vine Corner, gave it the same treatment and then started adding in my details.

I used Blue Fern Christmas Blooms, Soft Blossoms, silver leaves, and some mulberry paper flowers that I texture painted to on the frame and vine corner. I also added some real jingle bells, and 2 of my handcrafted Tiny Treasures Glistening Silver Butterflies.

To add the final, frosty touch to my layout I took some Shabby Flakes Chipboard, embossed them with Imagine Ink Icicle Embossing Powder, then puff painted the edges and added some sweet rhinestone and pearl buttons to the centers to create that Winter Shine.
Blue Fern Studios Supply List:
Paper:
Vintage Christmas 2 Collection
Let It Snow
Jolly
Chipboard:
Shabby Flakes
Organic Vine Corner
Vintage Christmas 2 Collection
Let It Snow
Jolly
Chipboard:
Shabby Flakes
Organic Vine Corner
Snowflake Frame
Embossing Powder:
Embossing Powder:
Icicle
Flowers:
Christmas Blooms
Soft Blossoms


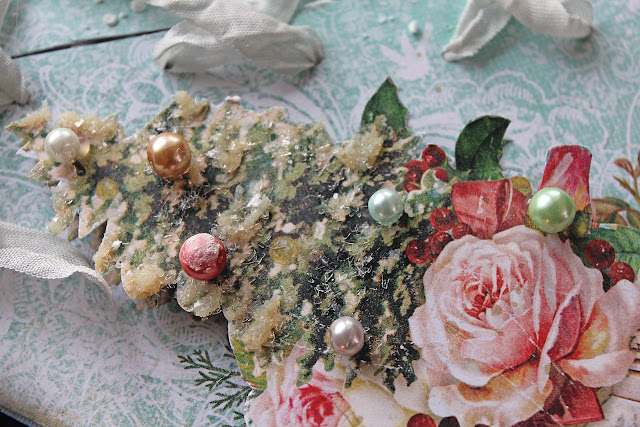
I used a 2nd sheet of the Wonderland Paper, and cut out the tree and the top rose piece and added those onto my layout with foam tape to make the design pop. I then painted the tree with sand texture paste, added some glitter glass and beads to "decorate" it. I added more flowers to the top cut out piece as well.

Here I have a side view that shows all the texture and dimension of all the technique and layering work.
Blue Fern Studios Supply List:
Flowers:
Christmas Blooms
Soft Blossoms
For my second Blue Fern Studios December Project, I have a Vintage Christmas Layout that I created with the Vintage Christmas Paper Collection:

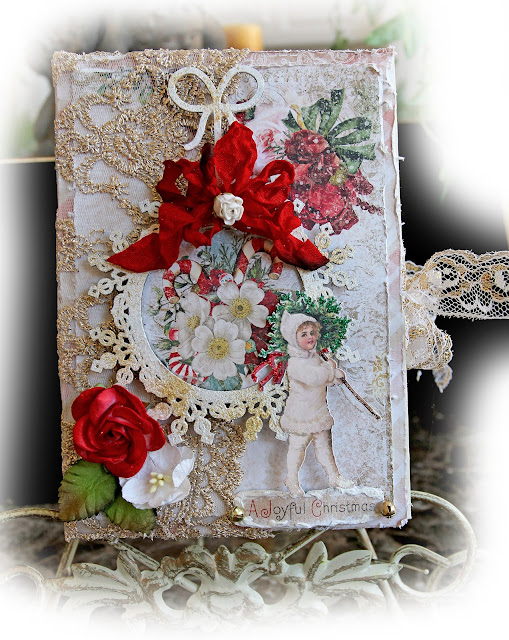
I took a layer of Wonderland Paper, and I created an angled cut and then did some lacing,

with seam binding and created a large bow that I topped with a mulberry paper flower.

I then did some stenciling with texture paste to create a frosty, textural Winter look.

I then ran some lace up the side, took a Blue Fern Ruth's Doily Chipboard Piece and stipple painted it with some gesso, and added my Vintage photo which is one that I recolored and added some angel wings to.

I created a flower layer using a mulberry paper flower that I sprayed with fake snow, a Blue Fern Christmas Bloom and a Soft Blossom. I took a little bottle brush wreath, added a bow and some beads and added that to the floral layer. The handcrafted butterflies are some of my Sweet Pea Glitter Glass Butterflies.

I used a 2nd sheet of the Wonderland Paper, and cut out the tree and the top rose piece and added those onto my layout with foam tape to make the design pop. I then painted the tree with sand texture paste, added some glitter glass and beads to "decorate" it. I added more flowers to the top cut out piece as well.

Here I have a side view that shows all the texture and dimension of all the technique and layering work.
Blue Fern Studios Supply List:
Paper:
Vintage Christmas Paper Collection
Wonderland (2 Sheets)
Chipboard:
Ruth's Doily
Flowers:
Christmas Blooms
Soft Blossoms


I added some elegant lace to the sides of the book box and created a closure tie with some more gold and white lace.


I covered the back side of the book box with Jolly Paper for a finished designer look.
Blue Fern Studios Supply List:
Vintage Christmas 2 Paper Collection:
Jolly
Let It Snow
Holiday Cards
Holiday Treats
Twas The Night
Chipboard:
Dangled Flake
Imagine Ink:
14 Karat Embossing Powder
Flowers:
Soft Blossoms
I just love a Vintage Christmas look and Blue Fern Products make it easy to capture that look and add in all the perfect details!! I hope that you have enjoyed my work for Blue Fern Studios as much as I have enjoyed working with their gorgeous products!! Hugs ~Renea
Vintage Christmas Paper Collection
Wonderland (2 Sheets)
Chipboard:
Ruth's Doily
Flowers:
Christmas Blooms
Soft Blossoms
For my third and final Blue Fern Studios Design Team project, I have a Christmas themed Book Box with Tag Album Set to share with you. I created this piece using the Blue Fern Studios Vintage Christmas Paper Collection.

The book box was already a beautiful Ivory color and so I just started layering on goodies to quickly produce a wonderful Vintage Christmas look.
I used a layer of Jolly Paper that I distressed the edges on, and then took a layer of Let It Snow Paper, distressed the edges on it and popped it on for a double layer look.

I added wide gold lace to the "binding" side of the book box and wrapped it around to the front over the edges of the paper layers.

I then took a Blue Fern Studios Dangled Flake Chipboard Piece, painted it with gesso, and then randomly dabbed it with embossing ink, and heat embossed it with Imagine Ink 14 Karat Embossing Powder. I cut out the candy cane piece from the Holiday Cards Paper, and mounted it in the frame, topped it with a hand dyed seam binding bow, and white mini rose, and then added one of my handcrafted Victorian Christmas Die Cuts.

Here you can see all the texture that the embossing powder adds to the frame.

At the corner of the frame, I added a mulberry paper flower, leaves and a Blue Fern Soft Blossom Flower. I cut the "A Joyful Christmas" piece from the Holiday Cards Paper, edged it with puff paint and added some tiny jingle bells.

I added some elegant lace to the sides of the book box and created a closure tie with some more gold and white lace.

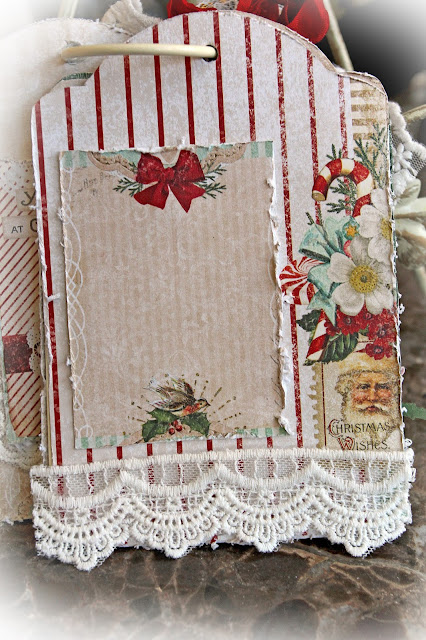
On the inside of the box, I used some Let It Snow Paper to cover the left hand side, and added more of the elegant lace. The tag album had 3 double sided tags and I got to work decorating them.

The front tag features Twas The Night Paper topped with a Holiday Cards Paper Piece, some lace, some Blue Fern Soft Blossoms, mini mulberry paper rose.

The back side is covered with the Twas The Night Paper.

The Second Tag features Holiday Treats Paper, topped with a Holiday Cards Paper piece, and some Delicate Lace.

The back side features more Holiday Treats Paper, topped with a Holiday Cards Paper piece, and some Delicate Lace.

The third tag features Twas The Night Paper, topped with Timeless Lace and a Holiday Cards Paper Piece.

And the back side features Twas The Night Paper.

Blue Fern Studios Supply List:
Vintage Christmas 2 Paper Collection:
Jolly
Let It Snow
Holiday Cards
Holiday Treats
Twas The Night
Chipboard:
Dangled Flake
Imagine Ink:
14 Karat Embossing Powder
Flowers:
Soft Blossoms
I just love a Vintage Christmas look and Blue Fern Products make it easy to capture that look and add in all the perfect details!! I hope that you have enjoyed my work for Blue Fern Studios as much as I have enjoyed working with their gorgeous products!! Hugs ~Renea
Oh my gosh! Where to begin? Simply breathtaking each project is!
ReplyDeleteThank you so much Patty!! I appreciate your sweetness <3
Delete